
Recently 23andme.com reduced their prices of DNA test kit to $99 and now you get your hereditary and other related information for price less than $100! That is a big drop from where it started $999 and then $299. I know little about genome/ genomics but it is a very interesting, dynamic, fast growing field which has potential to change the way we view health (one now is empowered to know whether they are at any risk of potential congenital diseases now or in the future ) or one's ancestry!
My interest was in the data that you can play with. With the API in place you can pull your or demo data. To do that first I needed to setup data pull through API and following is quick summary of setup I had on my mac.
Some important links:
23andme API
OAuth Introduction
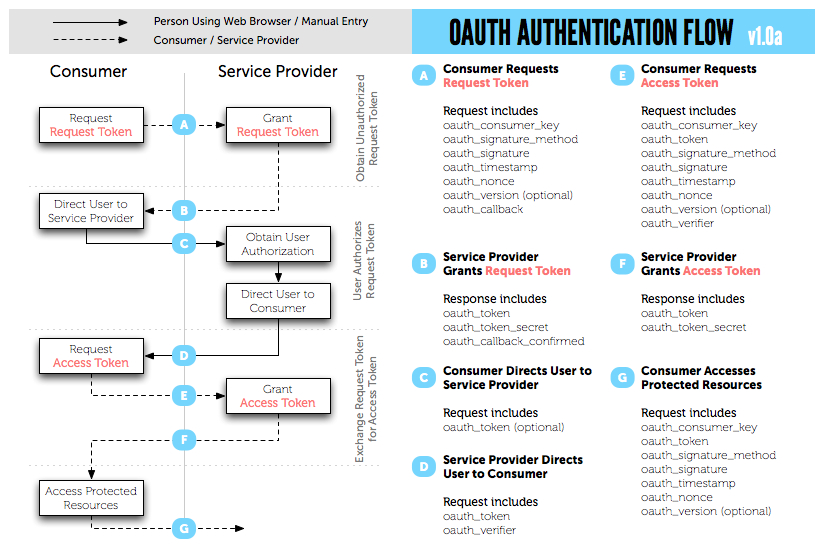
OAuth flow
After creating a developer login account you can set up the application/client with given credentials - client_id and client_secret. See below.

For quick testing and pull, I used Dancer web framework on local mac and 23andme uses OAuth2 with 3 legged authentication. As a first step get the 'code' by creating a simple page with link to their login page.
For exmaple link below takes the user to authorize your client and once successfully user logins the authentication dance happens between the client and server.
Note: pid above is a process id for me to know when I killed and restarted the Dancer.
User clicks on the link

and then login to authorize your client to access to her resources. This is the point where 'code' is received and exchanged for access_token.

After successful OAuth dance now you can call any of end-points ( https://api.23andme.com/docs/reference/ ). Here is demo user call ( https://api.23andme.com/1/demo/user/ )

My interest was in the data that you can play with. With the API in place you can pull your or demo data. To do that first I needed to setup data pull through API and following is quick summary of setup I had on my mac.
Some important links:
23andme API
OAuth Introduction
OAuth flow
After creating a developer login account you can set up the application/client with given credentials - client_id and client_secret. See below.

For quick testing and pull, I used Dancer web framework on local mac and 23andme uses OAuth2 with 3 legged authentication. As a first step get the 'code' by creating a simple page with link to their login page.
For exmaple link below takes the user to authorize your client and once successfully user logins the authentication dance happens between the client and server.
"a api.23andme.com="" authorize="" href="http://www.blogger.com/" https:="" redirect_uri="http://localhost:5000/receive_code/&response_type=code&client_id=YOUR_CLIENT_ID&scope=basic" rs123="">"Connect with 23andMe. [pid: $$]";
Note: pid above is a process id for me to know when I killed and restarted the Dancer.
User clicks on the link

and then login to authorize your client to access to her resources. This is the point where 'code' is received and exchanged for access_token.

After successful OAuth dance now you can call any of end-points ( https://api.23andme.com/docs/reference/ ). Here is demo user call ( https://api.23andme.com/1/demo/user/ )


